How to Use

The Test N'GO is easy to use with a 5 second test time and superior strip chemistry!
Step 1.  Perform a control solution test
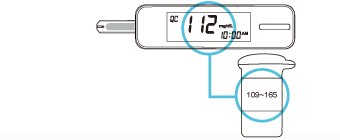
Insert the test strip to turn on the meter, then press the button to mark the test as a control solution test, QC will be displayed on the screen.
Step 2.  Perform a blood glucose test
Insert the test strip to turn on the meter and wait for the meter to display a blood drop symbol. Then, mark your reading as a pre or post meal measurement by pressing the button.
Turn the dial and select a puncture depth. Hold the lancing device tip firmly against the selected puncture site. Press the release button and obtain a drop of blood.
Gently apply blood to the absorbent hole on the test strip. Blood will be drawn in by superior sip-in action (capillary action) and the confirmation window will be completely filled.
After the meter counts down to 0, the reading will be displayed and automatically saved in the memory.
step 3.  Result interpretation

A symbolic message as shown below, will display with the test result. It is intended for your reference only. Please consult with your doctor for your blood glucose target range.

Should you have any concerns about your blood glucose levels, please consult your doctor immediately.

step 4.  Data transmission

Test results can be uploaded through Bluetooth connectivity to devices with iOS/Andriod operating systems. Please note you must first pair your meter with your device before you transfer the data.

Bluetooth
Turn off your meter, after it is off the Bluetooth indicator light next to the button will flash. Please place your device next to your phone and make sure that your phone is unlocked. The test results will automatically transfer to the iFORA app and the app will launch on your phone allowing you to review your readings.